Search
Settings for synchronising with channel manager MappingMaster
The requirements
In order to use the channel manager MappingMaster with Lodgit Desk, you’ll need:
- the module “Channel Manager Interface” from Lodgit, which you can order in our online shop at www.lodgit.com/shop
- an agreement with the channel manager MappingMaster. You can find a form listing their prices and terms in your Lodgit account at www.lodgit.com. Lodgit users will receive a special pricing as listed in the form.
- contracts and/or agreements with the internet booking channels that you can get on their respective websites.Got everything? Then we can get started!
Please note: It is not recommended to put all your units online if you connect several units to one channel manager category (e.g. single bedrooms in Lodgit to category “Single” in channel manager). Leave at least 1 unit online, so you’ll have some breathing room in the event of over-bookings.
Setting up your MappingMaster account
First, you’ll have to set up the units or categories you want to offer in the OTAs in MappingMaster. For any questions about this process, the MappingMaster team will be happy to help.
Activate rentable units for synchronization
You can easily adjust which rentable units can be booked online in the tab “Synchronise”. It is irrelevant whether these units will be synchronised with one or several online modules. Here, you’ll also decide which of your objects should be combined into a multiple-object system.
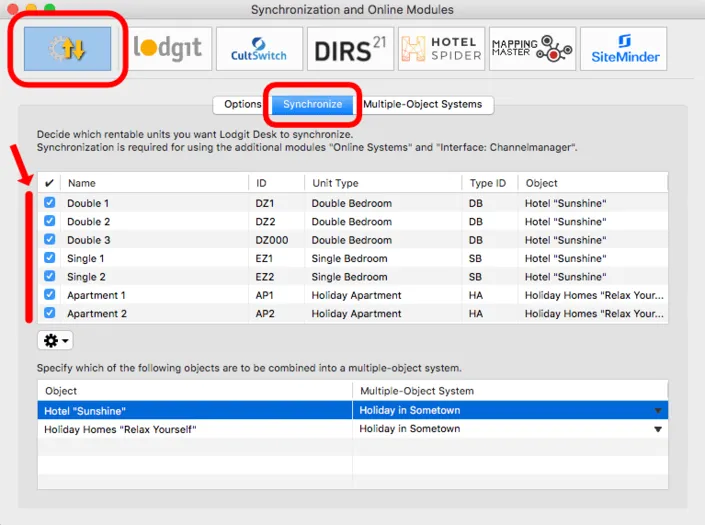
Multiple-Object Systems
Lodgit Desk allows you to combine different objects in Lodgit Desk into one system for the modules “Online Systems” and “Interface: Channel Manager”. Within Lodgit Desk, these objects will still be handled separately (e.g. to create separate statistics), online they are treated as one object, though.
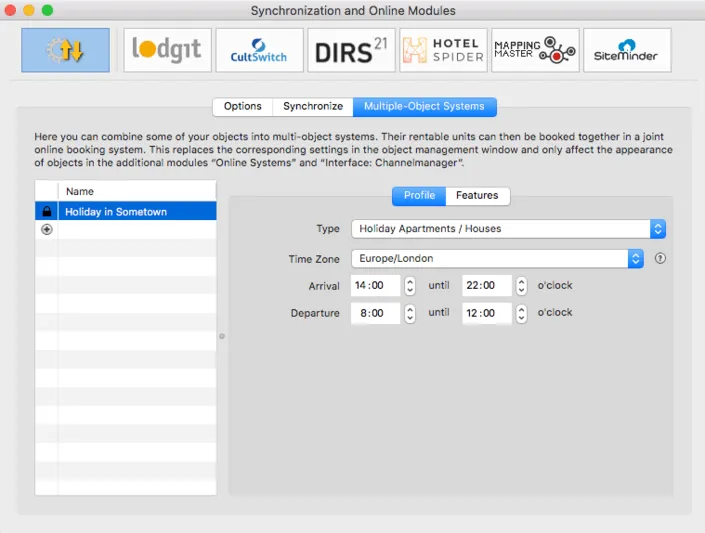
Assign units in Lodgit Desk
After you have added the categories or units in MappingMaster, you can now assign them to the appropriate units in Lodgit Desk.
- Open your Lodgit Desk installation and go to Administration > Synchronization and Online Modules > MappingMaster. Select the object you want to connect to the channel manager.
- Enter your MappingMaster Object ID into the field and then press the button Load MappingMaster IDs.
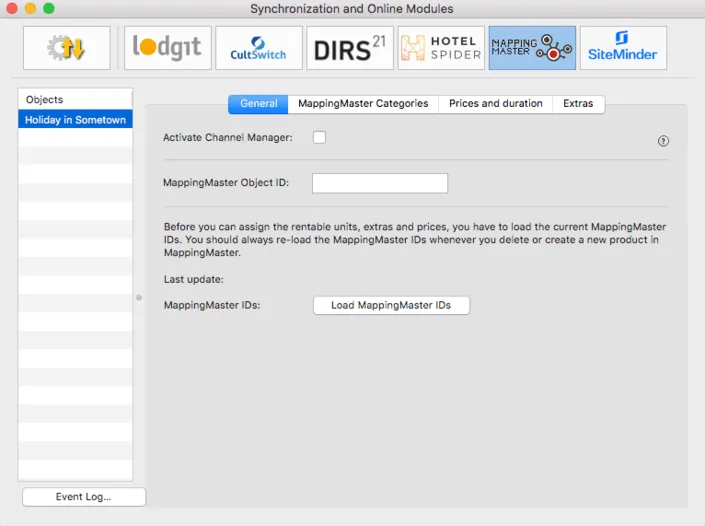
Then, switch to the tab MappingMaster Categories.
3. First, select the Mode (see red arrow). The Category Mode is suited best for accommodations with a lot of similar units, like a hotel. The Unit Mode is best suited for accommodations with very individual units, like a vacation home rental.
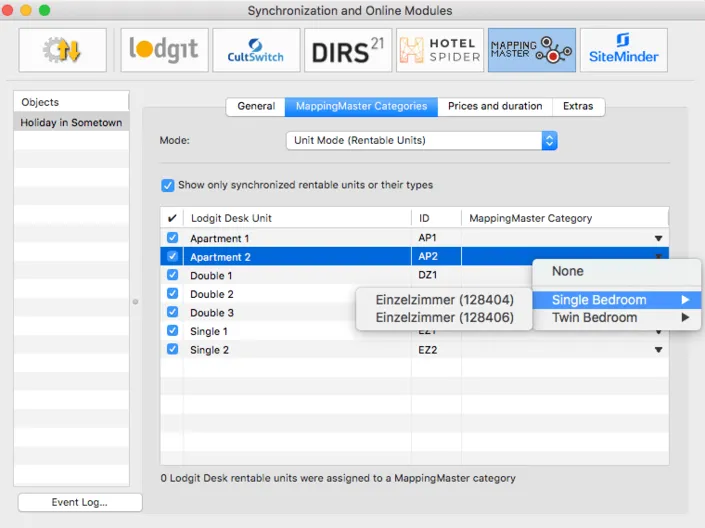
4. In the left column you’ll find your units or unit categories, depending on which mode you’ve selected. In the right column you can choose which MappingMaster category corresponds to which.
Please note: Categories or units you don’t want to synchronize with the channel manager can simply be deselected in the first column.
5. With that, you’ve already finished the basic setup. Test the connection by going to File > Synchronize. This will send your current availabilities of all selected units to the server and you can make sure the availabilities are listed correctly in the backend of the channel manager.
Please note: Due to server sync schedules, it may take a few minutes before the changes are displayed in MappingMaster.
Manage prices from within Lodgit (optional)
As a MappingMaster premium partner, Lodgit can also send prices to the Channel Manager.
Important: You can manage the prices EITHER in Lodgit Desk OR in MappingMaster directly. Changes made to the prices in MappingMaster cannot be imported into Lodgit Desk.
- Select your object in the window Synchronization and Online Modules > MappingMaster and go to the Prices area. Check the field Send prices to MappingMaster:
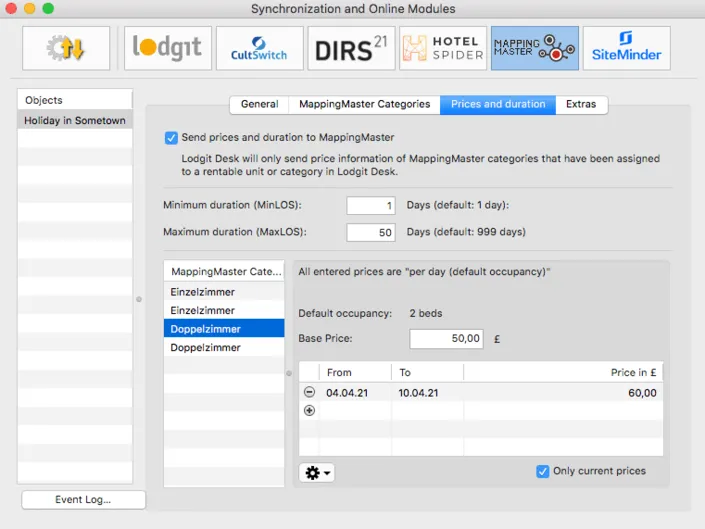
2. Select a MappingMaster category in the list and enter the base price. The base price is listed “per night” and default occupancy. It will always be used unless you’ve defined special prices for a time frame.
3. In the list underneath the base price, you can define time frames with different prices (e.g. seasonal prices). With the Actions menu you can import those price settings from your Price Management in Lodgit Desk.
4. You must add at least a base price for all categories! Test the connection by going to File > Synchronize. This will send your current prices of all selected units to the server and you can make sure the availabilities are listed correctly in the backend of the channel manager.
Please note: Due to server sync schedules, it may take a few minutes before the changes are displayed in MappingMaster.
Link MappingMaster extras to Lodgit extras (optional)
MappingMaster lets you create extras (“Products”) that you can link to the extras you have in Lodgit Desk. During the import of the bookings, the extras will then be selected and added to the booking correctly. That way, the bookings from MappingMaster will fit seamlessly into your analysis for extra items and services.
- Select your object in the window Synchronization and Online Modules > MappingMaster and go to the Extras area. There you’ll find a table listing all of MappingMaster’ extras in the left column.
Should you not see any extras listed in this table, please go back to General and click the button “Load MappingMaster IDs”. - In the column to the right, select the Lodgit extras you want to link to the MappingMaster extra item. Check the items that are going to be listed as ‘inklusive’ in the booking:
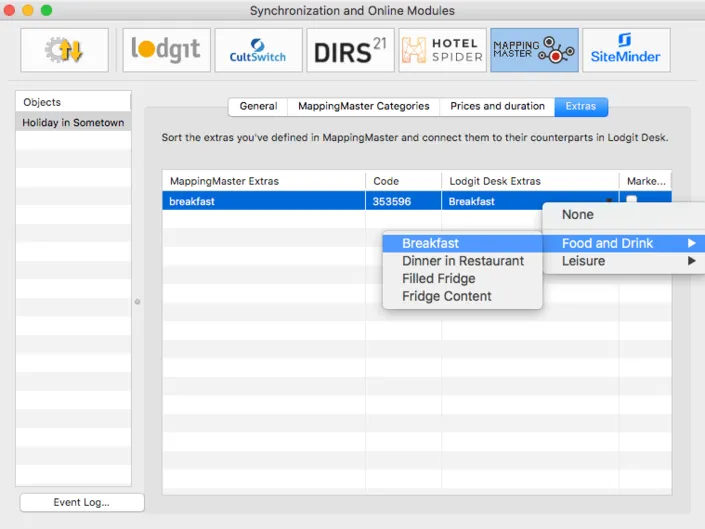
3. Test the connection by going to File > Synchronize. This will send your current extrasto the server and you can make sure everything is listed correctly in the backend of the channel manager.
Please note: Due to server sync schedules, it may take a few minutes before the changes are displayed in MappingMaster.
General options
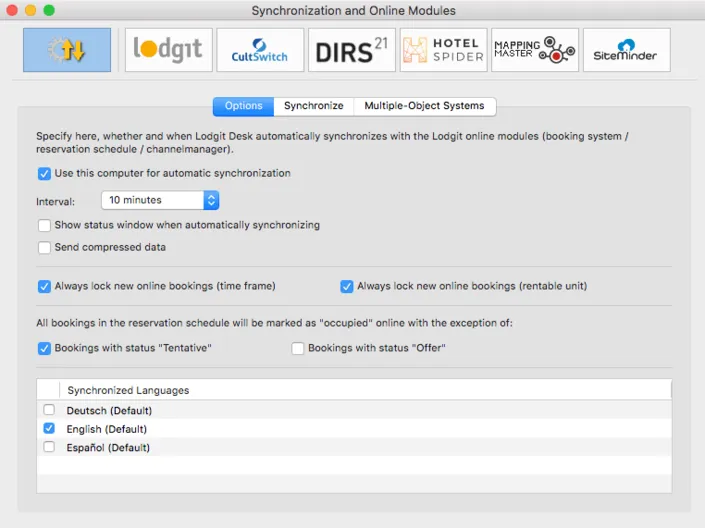
- You can activate this computer for synchronising automatically. When using the database server, you can then ensure that either all computers synchronise (always whichever computer comes first in the specified time frame) or only the computer(s) with the most stable internet access.
- You can specify the interval for the synchronisation
- You can also decide whether you want to see a window pop up whenever Lodgit Desk is synchronising with the online modules.
- New online bookings are now locked by default as soon as they’re imported. You have to manually unlock them to move them in the reservation schedule. Here you can turn that automatic lock off by unchecking the box.
- Furthermore, you can decide, if you want all bookings in your reservation schedule to be shown in the calendar as “occupied”, or if you want certain bookings to be shown as “vacant” instead.
Important: Bookings with the status Checked Out are generally considered “vacant” online. - Also, you have to check at least one language in your database that is to be synchronised.
Frequently Asked Questions Regarding Channel Managers
While the channel managers we currently connect to all have their differences, some questions concerning the basic functionality are the same for each of them.
If both online modules are used simultaneously in Lodgit Desk. What do I have to consider when acquiring?
For technical reasons, the number of rental units booked for the “Interface: Channelmanager” module can only be less than or equal to the number of rental units in the “Online systems” module.
How many units should I put online?
The channel managers themselves advise you to put only 90 to 95% of your available units online. Due to the synchronisation intervals, there is unfortunately no 100% guarantee against over-bookings. Having one or two units per category that you keep offline and usually book last can be a good buffer.
New online bookings always have a lock in the reservation schedule. What is that and how can I turn that off?
The lock means that a booking is looked and cannot be moved, shortened or lengthened. You can manually unlock a booking by unchecking the box in the booking window.
While we’ve added this feature as a security measure, it’s possible to turn off the automatic locking of new online bookings. You can turn this off under Administration > Synchronisation and Online Modules.
A booking couldn’t be allocated to a unit. What do I do?
Bookings that cannot be allocated to a unit in Lodgit Desk are first imported anyway. They will be shown in the Booking List with the note Without Object. During the import, the channel manager error log will also open and inform you about the issue.
There are different reasons as to why a booking cannot be matched. As soon as you have fixed the reason, you can open the booking via double-clicking the entry in the booking list or the error log and allocate it to the vacant unit:
The category wasn’t mapped to a unit:
If the category in the channel manager wasn’t mapped to any unit in Lodgit Desk, the booking can’t be automatically entered into a unit.
Check if the mapping is correct. If you’ve changed the categories in the channel manager, you then have to map them anew in Lodgit Desk.
The rooms aren’t free for the entire duration:
Lodgit Desk only tells the channel manager how many rooms are vacant, not whether those are the same units. If a room is vacant from A to B and another room is vacant from B to C, then it’s possible for a guest to book a unit from A to C.
Move bookings around to always allow for the longest possible duration. If you can’t free up a unit for the entire booking duration, you can split it. First, move the booking into the first free unit and then utilise the Split Function.
The rooms have recently filled up:
There are synchronisation intervals between Lodgit Desk and the server, between the server and the channel manager, as well as between the channel manager and the channels. The intervals are very small but necessary to allow all data to be passed through before new data is added. Despite keeping the intervals at only a few minutes, it is possible for a booking to come in even though the room was booked in the meantime.
In these cases, treat the booking as you would treat any other overbooking.
A booking came in through a channel but it hasn’t been imported into Lodgit Desk, yet. Why?
Because of the synchronisation intervals it may take some time for a booking to make its way into your installation. However, once it has reached the channel manager, it should take no more than three regular (automated) synchronisation processes for it to appear in Lodgit Desk.
Is the booking not imported even though it is listed in the channel manager, please contact us.
A booking has been changed in a channel. What happens in Lodgit Desk?
If bookings are changed in a channel, the original booking will be cancelled and a new booking will be created. Both bookings (old and new) will be linked if possible provided that at least one online-booking exists and it has not been replaced by a manually inserted booking.
This holds true for single bookings as well as for group bookings. In the booking list beneath the reservation schedule you find the bookings which have been modified.
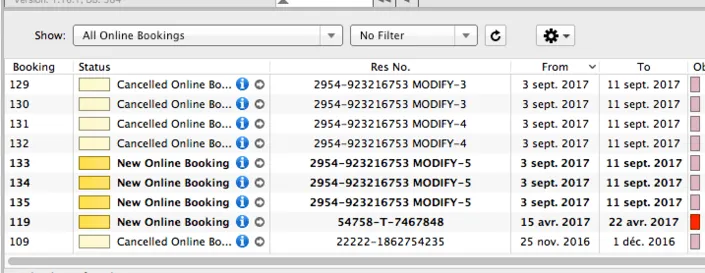
The latest booking is bright yellow, cancelled online-bookings are light yellow.
When you move the mouse on a modified online-booking in the reservation schedule and press the right mouse button a context menu will open. Please choose “Select Overbooking”. The latest booking as well as the previous bookings are indicated.
Please check whether you have manually changed anything in the cancelled online-booking, i.e. added services or written offers, confirmations or invoices. You can decide if you want to apply custom changes of the old booking to the new booking manually as well and which booking to keep or which one you might choose to delete.
When opening a booking and clicking on the icon “Online-Booking” you see whether the booking had been modified. Via modification number you see whether the booking has been modified a few times. The greater the modification number the more previous modifications of the booking exist.
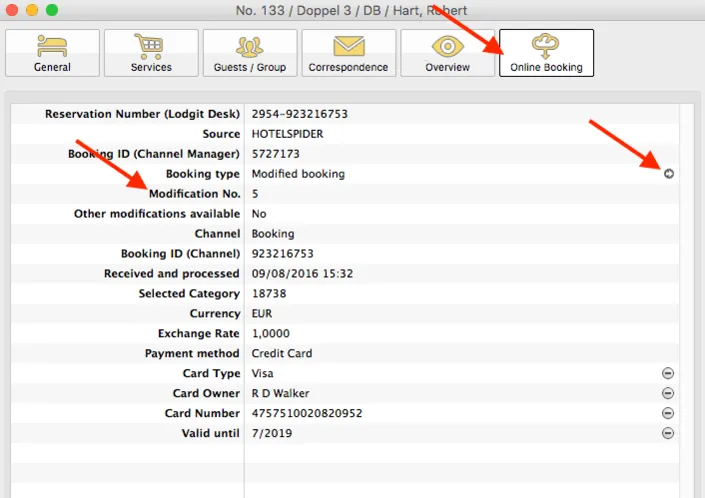
Please go to the little arrow on the right hand side in the line “Booking Type” to “Open previous modification”.
This might be not only one but multiple bookings.
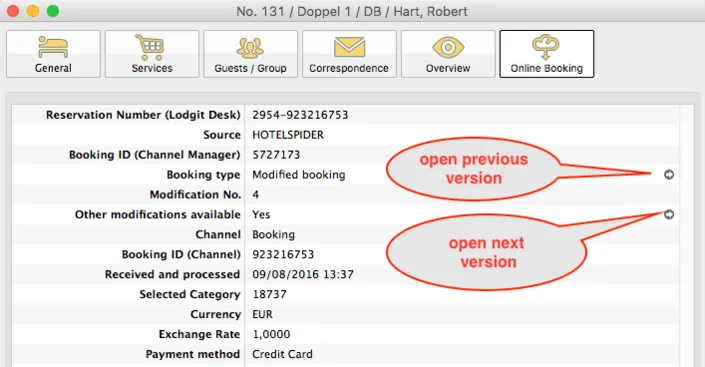
If you are not currently viewing the latest version you will see that there are further modifications present and you can switch to a newer (next) version by clicking on the little arrow icon (see screenshot above). You can also open the previous version by clicking the arrow above it.